UI / UX: Effects workflow comments

I read this interesting post about effects in KDEnlive:

Effects workflow

We had some in-depth discussions about how effects are displayed to the user, how to manage embedded effects (transform and volume) for timeline clips, as well as some preliminary steps on how to move towards a more “dope sheet like” management of keyframes. The current proposed changes are:

  • switch from a blacklist […]
  • add a link to the documentation […]
  • start working on mock-ups […]

To chime in on this: I think being consistent about WHERE effects can be applied is key to better UI.

Other NLE have established at least these locations:

  • clip pre-processing (common usage Video: LUT’s, Transform - resize, crop, mirror etc. Audio: Normalize, adjust Level) and so on. You can use these to prepare clips for editing.

  • timeline clip effects - everything in terms of effects the tool has to offer

  • timeline post-processing: (Video Limiter / Broadcast Safe Colours, Resize, Burn-Ins. Audio master bus effects like Limiter / Compressor etc)

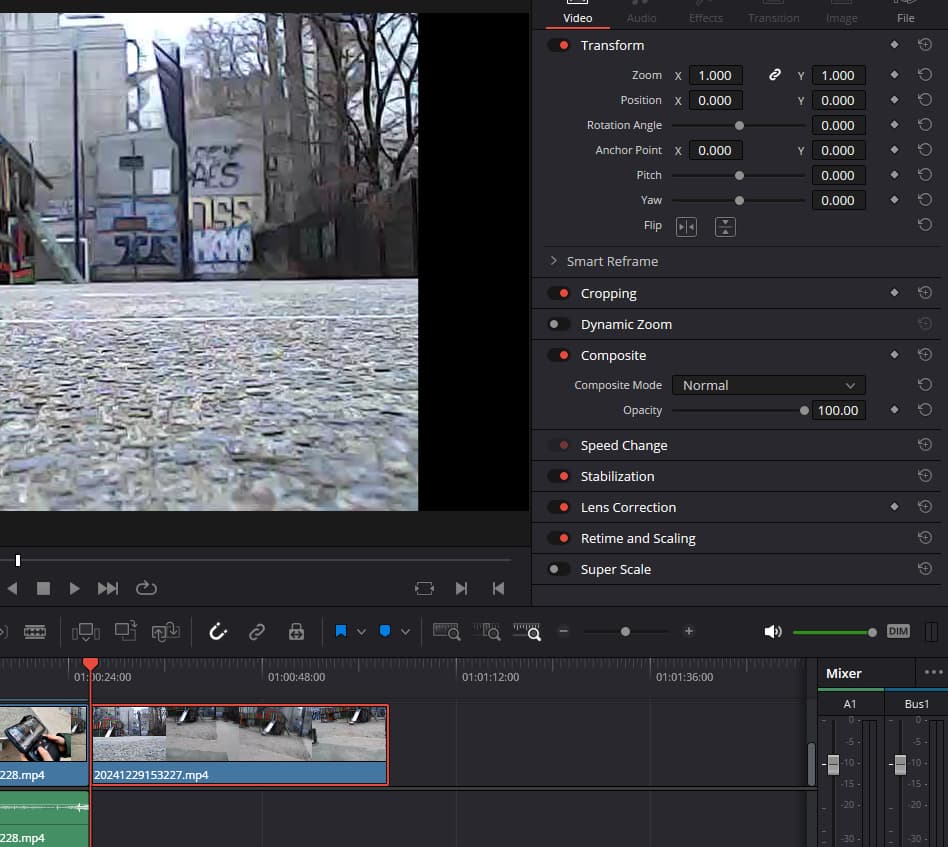
In the recent years, Adobe and Resolve have added something which are effects, but they are “pre-attached” to every clips and bring a quick access UI for these. I guess that’s what you are calling embedded effects in KDEnlive. In Premiere this is similar to the “Transform” effect in KDEnlive, so from a user perspective the “effect” turns into a property of every clip. Especially the way premiere handles this is nice and makes sense in nowadays editing requirements where it has become quite common to reframe source clips. What is a nice extra in premiere that all parameters of effects are always keyframable, including the pre-applied motion effect.

I think what is also an area where KDEnlive is lacking, is the logic of what are realtime effects, what effects have to be rendered and how this logic is presented to the user.

So to get back to the “stabilize” effect context menu for clips in KDEnlive. The UI should decide: is stabilize an effect, if not, what is it?
If it’s an effect, it should be moved together with all other things that can be applied in “pre-processing”. From an editors perspective, “Stabilize” as a pre-processing effect rarely makes sense because usually you want to stabilize a small portion of a longer clip. It should be a “timeline clip” effect.

In Resolve, there is no Effects Quick menu, it is the Effects Menu, since Resolve offers limited effects in the editing tab. To access all Effects avalaible in the tool, you have to use the “Fusion” Node Compositor or the “Color Tab”. Imho their UI is pretty illogical here, which is coming from the fact that the NLE part of the tool was later integrated.

Premiere “pre attached” Motion effect lets you keyframe the basics of the Clip and is pretty similar to the KDEnlive Tranform.

KDEnlive needs two Steps to apply this effect. Is there a reason why Transform (Image) and Volume (Sound) are not “pre-attached” as standard properties of clips?

If you enable built-in effects in Menu > Settings > Configure Kdenlive > Misc you get exactly that: transformation parameters and the ability to flip the clip horizontally and vertically for each clip without the need to add these effects individually and manually

2 Likes

What lead to the decision to make this optional?

Eventually we will turn it on by default, but since this feature was recently introduced, it will need some testing before doing that. Probably in April’s major release we turn it on.

1 Like

I’d noticed that option appear - but I hadn’t been able to find any discussion yet on how this might be different to just adding those effects manually?

Is there some functional difference to how they work, or how efficiently they work - or is it just a convenience for people who would normally add them to “most clips” or are used to them being always present, needed or not, in other tools?

I’ve recently put a “transform” button (among a few others) on the timeline toolbar - as a micro optimisation which saves me 2 clicks and an inch of extra motion to open the favourites box I also have there … and there wouldn’t be much between clicking that and ‘undisabling’ the built in effect.

I’m curious about this, because a “normal” project for me probably has more than half the clips already framed in camera needing no transform at all, the next most common case would have more than one transform (usually because I’m motion tracking something in the clip), with a few things (often title clips or related to that) having a single transform.

Likewise with audio - If I layer on an external soundtrack then most clips will have their audio simply muted, with a small proportion being volume controlled. If the external audio is from multiple sources it will get 2-pass normalised before the volume effect.

But I do have some projects that are still pushing some of the “too big” limits, so I am very interested in anything that gives me more headroom there. Do I gain or lose anything other than “convenience” by turning this on or off?

If enabling this adds more ‘disabled’ nodes to the project for all the ones I don’t use, that might not be a plus for the ones that are so big that even the UI has become sluggish when making any change …

And if it is just convenience, it would probably be nice for it to be a per-project setting, so that I can turn it on and off to suit individual projects rather than having to tweak the global default for each project.

I like the idea of having the option - but I don’t yet understand all the consequences of choosing to use it or not.

No, no difference. It’s like having added Transform and Flip effects. It’s meant to be a convenience for the user. Somewhat “inspired” by the Inspector panel in DR or what AP or FC have.

I don’t think we should embark (again) on a discussion whether this is mimicking the Big Four, needed by all of the users, or (yet) another (superfluous) feature whose time to develop should have been put to better use like bug fixing. As others have said here and in other chat rooms or forums, development is done following a roadmap and by listening to the user community and professionals. So I guess the bases are covered.

Kdenlive offers a lot of customization of the workspace, layout, keyboard shortcuts, and what have you, so the users can tailor the UI to their preferences and to make working with Kdenlive as easy and straightforward as possible. Within limits, of course. This means, that what works for one might be disruptive for another. But that’s not something new for any application with lots of functionality and a certain degree of complexity.

I’m right with you on that one :smiley:

I’d just been curious for the last couple of weeks whether them being called “builtin” had some bigger ramifications in how they were handled under the hood, or whether it was only “UI candy” for people who wanted them on all clips by default - and I hadn’t got around to digging through git to see what the relevant commits changed yet.

I don’t even mind if they default to on or off for new installs if it stays a configurable option I can set to what works best for what I’m working on at the time.

That said though (:

It looks like there is at least one small difference (and a bug) … with the “builtin” effects, they don’t get the buttons to move them up or down the stack. If I add other effects, it won’t let me drag or move them above the builtins, but if I drag the builtin below those kdenlive crashes.

If I disable the “enable builtins” option, then any builtin I had enabled for a clip becomes more like a “normal” effect (it gets the move buttons back) - but trying to actually move them through the event stack still results in a crash.

This is with the 24.12.0 appimage